Saturday, June 2, 2012

Rice Protein Drink (gluten free, vegan, soy free)

I thought I’d share my protein drink. I generally have this after a good workout or if I am on the run and need a quick meal before I leave home. I think it tastes great and is quick and easy.
I start with rice milk but you could use whatever milk substitute you prefer. I add brown rice protein powder (since I can’t tolerate dairy/whey or soy products), vanilla (pure with no corn syrup), agave nectar, and chia seeds. I chose agave nectar because it has a low glycemic index compared to other sugars (meaning it won’t send your blood sugar out of whack) and, being a liquid, it desolves quickly.
Now what is a chia seed you may ask. Cha-Cha-Cha Chia. Yep. It’s the same thing they use to grow green hairy sprouts on the tops of heads like Garfield, Shrek, sheep and others. It turns out that they are incredibly nutritious and high in Omega fats much like flax seeds. However, unlike flax seeds you do not have to break the hull of the seed in order to get the nutrients. Your body can digest it. It was an ancient food of the Aztecs and Mayans.  Here’s a little more info if you’re interested. http://drlindsey.com/introducing-chia-the-super-seed/ and http://chiaseedsguide.com/chia-seed-history/
I usually make my drink/shake in a mason jar with a lid. I throw everything in and shake it up. If I still have some clumping of the protein powder I’ll just take a whisk and place it in a jar. Then I’ll roll the whisk handle in my palms spinning it inside the jar. That usually does the trick. I’ll shake it again after that if needed. If you wanted you could certainly use a blender instead. I generally don’t since I would then need to clean said blender….
Then, drink it down. I usually drink mine rather quickly since the seeds will often sink to the bottom and be difficult to get out. If you don’t have the seeds or don’t want to use them, just make the drink without them. It’s still filling, nutritious and beneficial. And please don't worry about exact measurements, I usually just eyeball it.

Live long. Plant strong!!


Rice Protein Drink (gluten free, vegan, soy free)

8oz. rice milk or other milk of choice
1 or 2 rounded TBS rice protein powder or other protein powder of choice (I use 2 TBS)
1 or 2 tsp pure vanilla extract (to taste, I use close to 2 tsp)
2 tsp or 1 TBS agave nectar
1 TBS chia seeds

Place all ingredients in a mason jar with a lid or a large glass you can fit a whisk into. Shake and/or whisk the ingredients together until no clumps remain and drink is well blended.

Tuesday, May 29, 2012

Black Bean Veggie Burgers (gluten free, vegan, no oil)


Well, I’ve been playing around with this veggie burger for awhile and think it’s ready to go. My biggest problem (in general) is measuring ingredients. I’ll start off okay, but then something won’t have the right consistency or spice and I’ll adjust it a bit, then a bit more, and maybe more. By then I have no idea what I did after my initial measurements and will have to try again next time based on the little notes I make to myself. Eventually, I get it. But it usually takes a time or two. Thanks to all of you, I am forced to measure which obviously makes it easier to reproduce my food!
With these burgers the other difficult thing to figure out was the moisture content and how to deal with it. What I have discovered in this process is that this burger is very forgiving in this respect and yields a soft, not dry, yummy burger. While you may need to add a tablespoon or two of water to get the mix to blend in the food processor, if you puree the onions and garlic first that usually yields enough liquid that the rest of the ingredients will blend nicely. I cook my own beans because they are so cheap and easy. I’ll often make the beans and rice one day and make the burgers in the next day or two. You can use canned bean as well. I do find canned beans to be a bit wetter so rinse and drain them well.
This burger is great to have in the freezer. And I think they actually taste better after the day they are made and are heated a second time. Like so many things the flavors are just better the next day or so, even if they’ve been in the freezer. I love being able to grab on when I am hungry but don’t feel like cooking. And my whole family likes them!!! How often does that happen?!?! They take about 1 minute to warm in the microwave or 8-10 minutes in a covered pan on the stovetop on medium/low heat (4-5 minutes each side). If you are warming a bunch of them you could put them on a cookie sheet covered in foil and warm them in the oven, or wrap them in foil and heat them on the grill.
Once heated you can top them however you like. In the photo above I made mine with guacamole, lettuce, tomato and ketchup on gluten free toasted bread. It was definitely as good as it looks! Feel free to play with the spices to fit your tastes.
Hope you like ‘em!

*Disclaimer….These are delicious black bean and rice burgers. They are not intended to taste like a beef burgers nor do they. If you make these burger and they come out tasting like spiced black beans and rice….you have succeeded!! Enjoy.


Black Bean Veggie Burger (gluten free, vegan, no oil)

2 c. cooked black beans
2 c. packed, cooked short grained brown rice (long grain brown rice is okay and day old is best)
1/2 -1 c. uncooked pureed kale (optional)
1 large onion roughly chopped
3-5 garlic cloves roughly chopped (depends how much you like garlic)
2 TBS nut butter of choice (I used sunflower butter)
1/2 tsp black pepper
1 tsp salt
3 TBS ground flaxseed meal
1 1/2 c chili powder
1/4 c. arrowroot or potato starch (tweak: use flour or starch of choice)
1/4 c. brown rice flour (tweak: use flour of choice)

Puree kale in food processor. Remove kale and set aside in another bowl. In the same processor puree onion and garlic. Add beans and puree. Add nut butter, flax meal, and spices. Puree. Add kale back into food processor. Puree until all ingredients are well blended. If needed add 1-2 TBS of water to processor to allow ingredients to puree.


In a large bowl place 2 cups of packed cooked rice. Scoop pureed ingredients into the bowl and stir well with the rice. Then add the starch and flour to the mixture. Stir until combined. Mixture will be thick and sticky.

Divide mixture into 8-10 equal parts. You can do this by flattening the mixture into the bowl and scoring the top with the end of a spatula so that it looks like a cut pie.

Line two cookie sheets with parchment paper. With the spatula scoop a piece of the “pie” and roll into a ball. Place on the cookie sheet and flatten into a patty about 1/2 inch thick. Repeat until sheet is full, usually 6 patties. Bake for 30 min at 350 F. Then flip the burgers over and bake for 15 more minutes. Remove, cool, and freeze if desired.


Repeat with remaining mixture. If you choose, you can cook both batches in the oven at the same time. If they will fit, you can put the sheets side by side and follow the above baking instructions. If the sheets will not fit. Place them on separate racks. Bake for 30 minutes but alternate the sheets half way through. After the 30 minutes flip the burgers, alternating the sheets again. Bake 20 minutes alternating the sheets half way through. Remove, cool and freeze if desired.

Monday, May 7, 2012

Slow Cooker Baked Beans (vegan friendly, gluten free)

I’m back on the planet as my mom would say. Sorry for my lengthy absence. Life got a little crazy for a bit, so my poor little blog took the brunt of my neglect. But no more! I’m ready to roll!
This week I’m sharing my slow cooker baked bean recipe. These beans are great for any time of year whether it’s snowing or you’re grilling. I always make them as “backup” when I am going to be with a big group, usually family. We have vegetarians, vegans, people who don’t eat wheat and people who eat everything. In my recipe I do not use salt pork or bacon (a traditional ingredient) making my beans completely vegan. So, this recipe is perfect. It gives a great side dish for the “everything” eaters and a great main dish for the vegetarians.
To make the beans you do need to think ahead a bit. You have to remember to get the dry beans (just pick them up when you see them, they don’t go bad and are sooooo cheap), and you need to remember to soak them overnight or about 8-9 hours.
To soak them, check them for rocks and molded beans first. To do this simply pour the beans into your hand, check them over removing any foreign objects, then dump them into a bowl. When you are done rinse the beans, then fill the bowl of beans with water. Make sure your bowl is bigger than you think you need and has more water than you think is needed since the beans will about double in size. Now, if you have soaked your beans and didn’t get around to cooking them….don’t panic. They’ll keep…several days actually…as long as you change the water they are soaking in each day. If I am doing this I will usually give them a rinse too before soaking them in a second batch of water.
These beans do take awhile to cook but are well worth it. The long cooking time intensifies the flavors. Plan on cooking them for 12-15 hours on the HIGH setting. I’m serious. So, if you want them for a BBQ in the afternoon you’ll need to start them the evening before. But be careful of your bean choices. They are not created equal. The pintos and navy beans tolerate the long cooking time, but a bean like Great Northern does NOT. They break down too easily. You will end up with a starchy mushy mess, which would be great if we were making refried beans…….but we are not.
I usually make a double batch of these beans when I make them since it is the same amount of work to make 2 batches vs 1.  When the beans are done I take half the batch and freeze it. It’s such a nice surprise to have them waiting in the freezer when you don’t feel like making dinner! I use them to make burritos, or add it to salads, or eat them with fresh veggies and cornbread.
Hope you like them!

Slow Cooker baked beans (single batch recipe)
1 lb dry Pinto Beans or Navy Beans (check for stones, rinse and soak overnight)
1 medium or large onion sautéed in a little oil until clear
½ cup molasses
¼ cup brown sugar
1 tsp salt
½ tsp black pepper
2-3 TBS brown mustard
Place presoaked and drained beans in the crockpot/slow cooker. Add just enough fresh water to barely cover the beans with some beans peaking through. Add the sautéed onion and all other ingredients. Stir. Set slow cooker to HIGH setting and cook for 12-15 hours until desired consistency is reached. Feel free to adjust the salt, sugar and pepper to taste. Then just eat ‘em up and freeze what you don’t!

Thursday, March 29, 2012

Roasted Potatoes-Low Oil

I love roasted veggies. The roasted outsides and mushy insides make me happy and my husband too. I think he could eat potatoes at every meal all day and be happy. He loves them any way but roasted is one of his favorites. The only downfall to the roasted vegetable is that, often, you need to use quite a bit of oil on them so they don’t stick to the pan especially when cooking particularly starchy or sugary veggies like potatoes and sweet potatoes. Recently, our family started to adopt a low oil diet. That isn’t to say we don’t every have oil. We’ve just tried to stop using it as a food group…..I do love my olive oil. Seriously, I could almost eat it by the spoonful. Not the healthiest food choice that way. So, I’ve been trying to find ways to eat some of what we love without all the oil.
Now let me just say that I have literally fallen in love with parchment paper. Nothing sticks to it and things still brown. I’ve started using it a lot. For cookies, for packets of veggies on the grill wrapped in aluminum foil, and for ROASTED VEGETABLES!!!!! It is such a miraculous thing to me, and it makes cleaning up a piece of cake too! Always, always, always a plus for me……
Most of us roast our veggies on some sort of baking sheet. The only issue with using the parchment paper is that is moves around making it rather difficult to use a spatula to flip/stir the vegetables as they cook. One night while prepping dinner I had an idea. I had two baking sheets of the same size, so I cut the parchment paper a few inches (4 or 5 I would guess) larger than the pans. Then I put the parchment the first pan and wrapped the paper underneath the pan and placed that pan inside the second pan which held the paper in place. And Voila! It worked perfectly. I was able to easily use the spatula without the parchment moving. Perfect!
As for the recipe for the potatoes, I’ll do my best. Not a lot of measuring going on and it is a matter of taste. Pick the herbs/spices you like and remember salt.
Here is what I USUALLY put on my Low Oil Roasted Potatoes.
·    Chop up some potatoes and place in a large mixing bowl (1 inch or less cubes work well      and larger or smaller is fine too. You’ll only need to adjust your baking time.)

·    Sprinkle on some salt, pepper, garlic powder-don’t go crazy with this one (you can also use fresh chopped garlic), onion powder and sage.

·    Toss with hands to coat potatoes with spices.
·    Add about 1 tsp or less of olive oil  (per 5-6 medium potatoes) and toss with hands again.

·    Dump potatoes out onto prepared parchment lined pan.

·    Bake at 400 F for about 1 hour. Check them every 15 minutes and turn them with a spatula each time. Remember baking times will vary based on the size of the potatoes and the amount of “roastedness” desired.

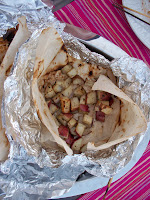
And don’t forget summer is on its way. These same potatoes can be cooked on the grill in about half the time. Simply take a large piece of aluminum foil and line the foil with parchment paper leaving about a 1 1/2 to 2 space between the end of the parchment paper and the foil to allow for folding. Place prepared potatoes on the parchment and fold the parchment over to cover the potatoes (like you were folding over wrapping paper). Then fold over the foil and fold over the edges a few times and crimp tightly. Place on a hot grill for about 20-30 minutes turning once if desired. Open these pockets of yumminess and eat!!!

Saturday, March 24, 2012

Crazy Tweaked Chocolate Chocolate Chip Cookies (vegan, gluten free, oil free, nut and seed free)

Aren’t there times when you just wish someone would say, “Excuse me, but would you like a cup full of cookies?” Mmmm, yes, yes I would…with a cup of coffee please. Ooooo and a nap! (sigh) I like la-la land. Anyway, since that NEVER seems to happen and since fantasies can only be so real….make some for yourself! You totally deserve it!
These cookies are based on my recently created Crazy Tweaked Chocolate Chip Cookies (2/29/2012 post).  These cookies have no oil so there is also very little guilt involved with eating A CUP of cookies. These crazy treats are suitable for most dietary restrictions and they taste fantastic. They are crispy on the outside and kind of like a brownie on the inside. Yeah, they’re terrible.
If you would like a richer chocolate cookie you could use my Chocolate Chocolate Chip Cookie from my first post. And if you want to use traditional flour instead of the gluten free flours just replace the sorghum flour, rice flour and starch with 1 cup of all-purpose flour and omit the xanthan gum.       
So, cheers my friends. I raise my cup of cookies to you!!


*Special thanks today to my 3 year old baking assistant. She runs my mixer (and a lot of my world!). 


Crazy Tweaked Chocolate Chocolate Chip Cookies (Gluten free, vegan, nut/seed/bean free and no oil products)

1/4 c. sorghum flour                                             
1/2 c. plus 2 TBS white or brown rice flour (tweak: replace 2 TBS of rice flour with 2 TBS protein powder of choice)
1/2 c. plus 2 TBS cocoa
1/4 c. potato or arrowroot starch
3/4 c. sugar
1/2 c. brown sugar
1/4 tsp. baking soda
1/2 tsp. baking powder
1/4 tsp. Xanthan Gum
1/2 tsp. salt
1/2 c. rice milk (or other dairy free milk ...tweak: you could use a dairy milk instead if you prefer)
1 tsp. vanilla
1 c. dairy free semi-sweet chocolate chips (like Ghirardelli Semi-Sweet Chocolate Chips or dairy and soy free like Enjoy Life brand semi-sweet chocolate chips)
_________
In a mixer mix the sugars and the rice milk and vanilla. In a separate bowl stir all the other dry ingredients together using a wisk. Add the dry ingredients to the wet and mix well. The batter/dough will be a little looser than traditional chocolate chip cookie dough. It should slowly lose its form when scooped. If it is too stiff add an additional 1-2 TBS of rice milk. Stir in chocolate chips.

Spoon by rounded tablespoons onto the cookie sheet. Make sure you use parchment paper for these cookies because without any fat in the dough they will stick to a plain cookie sheet. You could use a SILPAT silicone baking pad, but I found that the paper worked better.
Bake at 375 F for 12-14 minutes. (I consistently bake them for 13 mins.) Cool slightly on the pan then move to cooling rack. Eat.
*Allow to cool very well before placing in airtight container.

Friday, March 16, 2012

Irish Soda Bread (traditional, gluten free and dairy free options)

Well, St. Patrick’s Day is upon us. It’s time for all things green, leprechaun, or made with Guinness. I thought I’d give you a somewhat traditional Irish treat for the occasion. Now normally I don’t care for soda bread…too much baking soda for my taste buds most of the time. But my son and his class made soda bread this week in school using a recipe from allrecipes.com called Irresistible Irish Soda Bread.  http://allrecipes.com/recipe/irresistible-irish-soda-bread/ He brought home a piece for me to try and it was quite good. So, I thought I’d alter it and see how it came out.
I made it last night and tried it this morning (it is recommended that you eat it the next day or several hours after cooling for best flavor). I really liked the flavor and could see making this as a savory bread or muffin to go with dinner. My son loves it and has already had 3 pieces (so have I)! If you made muffins I would guess the baking time would be around 25 minutes give or take 5 minutes. Also, if you DO prefer a more soda-y soda bread you may want to increase the baking soda to 1 1/4 or 1 1/2 tsp. I chose to use white rice flour instead of my usual brown rice to keep it closer to the white flour used in the original recipe, but feel free to use the brown rice and I probably will next time.
This bread would also be great with select herbs added. Erin go bragh!

Irish Soda Bread (traditional, gluten free and dairy free versions)

3 cups all purpose flour (tweak for gluten free: 1 1/2 c. sorghum flour and 1 3/4 c. plus 2 TBS white rice flour and 1 tsp xanthan gumas you can see I increased the total flour by 6 TBS )
1 TBS baking powder
1/3 c. white sugar (I used organic cane sugar)
1 tsp salt
1 tsp. baking soda (increase by 1/4 tsp -1/2 tsp if you want to taste more of the soda)
1 egg lightly beaten
2 cups buttermilk (tweak for dairy free: 2 c. rice milk less 4 tsp of vinegarmeaning: place 4 tsp of vinegar in a cup then add enough rice milk to equal 2 c.)
1/4 c. melted butter (tweak for dairy free: use grapeseed oil or oil of choiceI think grapeseed has a somewhat buttery flavor)
___________________
Directions:
Preheat oven to 325 F. Grease a 9X5 loaf pan or muffin tins.
Combine all dry ingredients and stir together using a wisk. In a separate bowl beat the egg then add the rest of the wet ingredients together. Pour wet ingredient mixture into the dry ingredients stirring to combine. Pour into prepared pan.
Bake for 60-70 minutes or until a toothpick inserted in the center comes out clean. Cool for about 10-15 min then remove from pan to completely cool on wire rack. Once cooled wrap bread in foil for several hours or overnight for best flavor.

Monday, March 5, 2012

Pure Vanilla Extract: Is it gluten free?

Some people have wondered if they need to purchase “Gluten Free Vanilla” if they are trying to make gluten free products. Here’s the 411. Pure vanilla extract IS gluten free. You don’t need to buy special vanilla. I think the concern was born out of the fact that many grains (like wheat) are used to make the refined alcohols used in things like vanilla extract….. or your favorite martini. However, the distillation process does not allow any of gluten proteins to pass into the final product. So, none of the gluten that may have been used to make the alcohol ends up in the alcohol or the vanilla it is used in. If companies are labeling their pure vanilla extract product as “gluten free” they are likely doing so to get people’s attention and  to become part of a niche market. Much like when many manufacturer started labeling their products “fat free” even though their product had always been fat free and their wasn’t anything new or special about it…..like fat free marshmellows…..makes them SEEM healthier doesn’t it?
Oh, while on the topic of vanilla. Look at other stores for great prices on vanilla. The grocery store prices are ridiculous for the amount of vanilla you get AND many of the major brands include corn syrup. You can get pure vanilla extract (vanilla beans, alcohol and water) at places like The Christmas Tree Shop (about $3.50 for 8oz), Reny’s (in Maine), etc. for far cheaper than the grocery store for an often better product. Also, look in those stores for Bob’s Red Mill flours and products too…..also cheaper than the grocery store!
That’s it for today’s class of Vanilla 101.  Use freely!!!